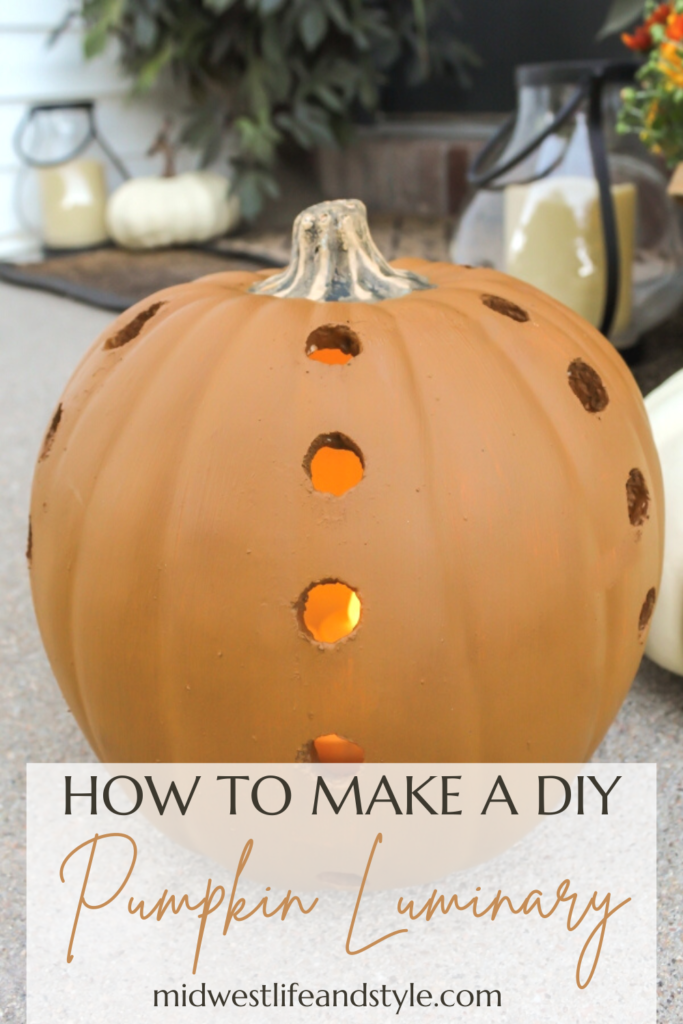
Do you love to DIY? Then you’ll love this budget-friendly fall craft. See how to make a pumpkin luminary all for less than $25!
*As an Amazon affiliate, I earn from qualifying purchases at no extra cost to you. My blog contains other affiliate links as well for your convenience. To learn more, you may read my Disclosure Policy. Thank you for supporting my blog!
Fall Decor On A Budget Blog Hop
The first official day of fall is still a few weeks away, but today I’m excited to join 9 of my blogging friends to share some budget-friendly fall decor ideas.
Whether you’re in full-on cozy decor mode, or slowly starting to dip your toes into the seasonal decor pool, this hop is full of DIYs and decorating tips to help inspire you as you welcome fall into your home.
Thank you to my friend, Heidi, from Eleanore Rose Home, for asking me to be part of this fun and talented group of bloggers.
If you are visiting from Emily at LeCultivateur, thank you for stopping by! I love how she created beautiful decor from nature, and I will definitely be using some of her ideas for inspiration in my own home this fall.
If this is your first visit here, welcome! My name is Jen. I’m a lifelong Nebraskan and the creative voice behind Midwest Life and Style. I love to plan events by day, and blog, bake, and DIY by night.
Here at MWLS, you’ll find that I love to share a little bit of everything, including affordable home decor, DIYs, simple recipes, and inspiration for everyday living.
If you are not already a part of the Midwest Life and Style family, I’d love to have you join me! You can subscribe HERE to receive my weekly newsletter. It’s filled with all of the latest posts, links to things I love, and more.
You can also find me on Pinterest, Facebook, Instagram, and TikTok. If social media is your cup of tea, be sure to follow me on each of my channels for more behind-the-scenes fun.
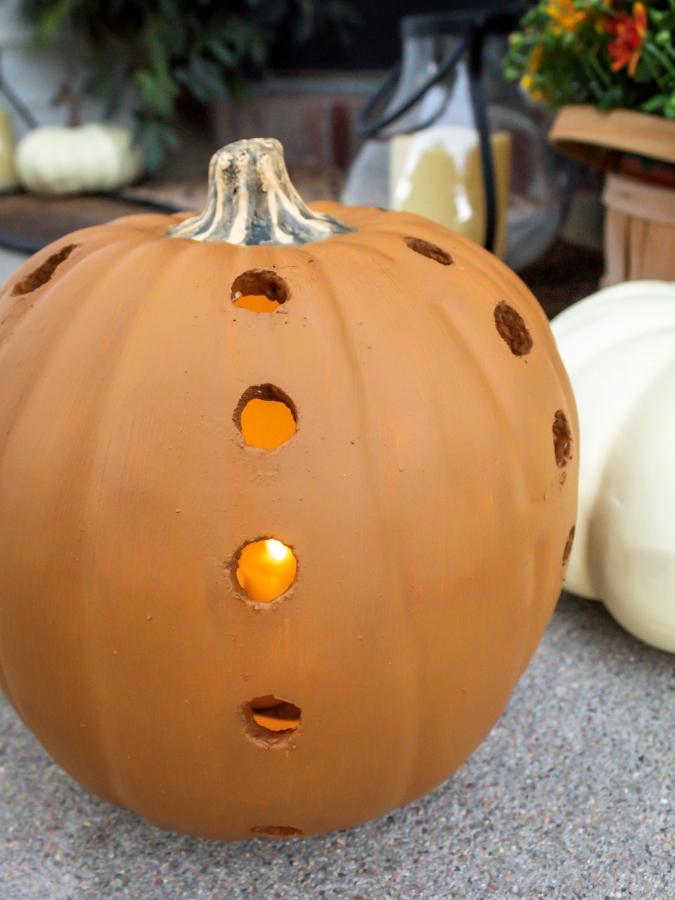
How To Make A Pumpkin Luminary
Several years ago, I saw the idea for a DIY pumpkin luminary in a magazine. Fast forward to the present day, and it’s the perfect budget-friendly project to share with you this fall.
It’s easy to make this craft in an afternoon. And if you have a stash of faux pumpkins laying around, chances are, you may already have most of the supplies on hand that you need to make your own.
Disclaimer: This project can get a bit messy. Drilling into a faux pumpkin = flying bits of styrofoam. I recommend setting up outdoors for easy clean-up once you are done.
Pumpkin Luminary Tools And Supplies
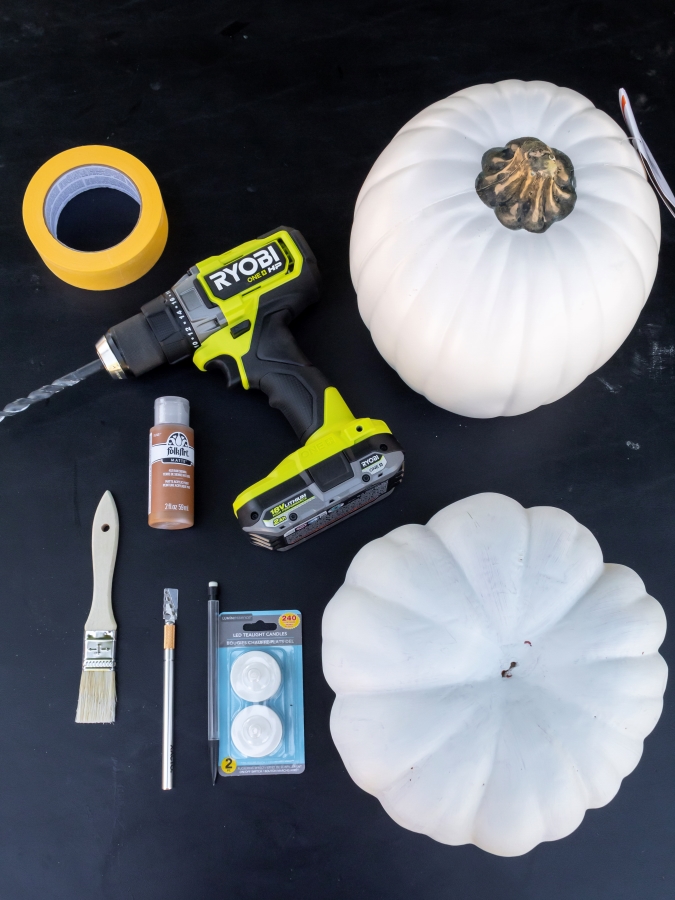
- Faux (Hollow) Foam Pumpkin
- Drill and Drill Bits
- Craft Paint (I used this acrylic orange paint)
- Paint Brush
- Protective Eye Glasses
- X-Acto Knife
- Battery-Operated LED Tea Lights
How To Make A Simple DIY Pumpkin Luminary For Fall
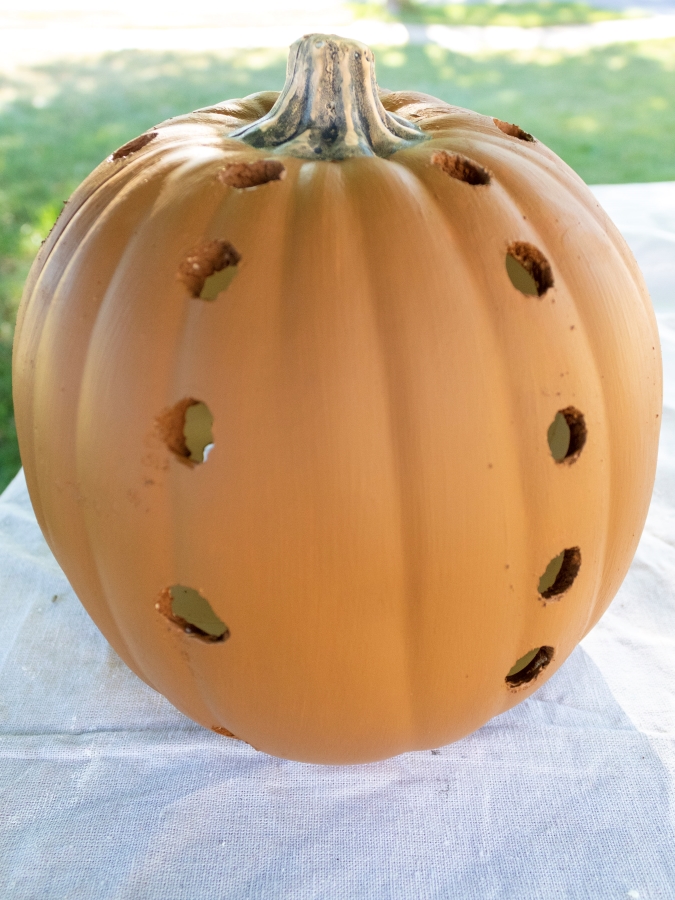
1 . Cut A Hole In The Pumpkin
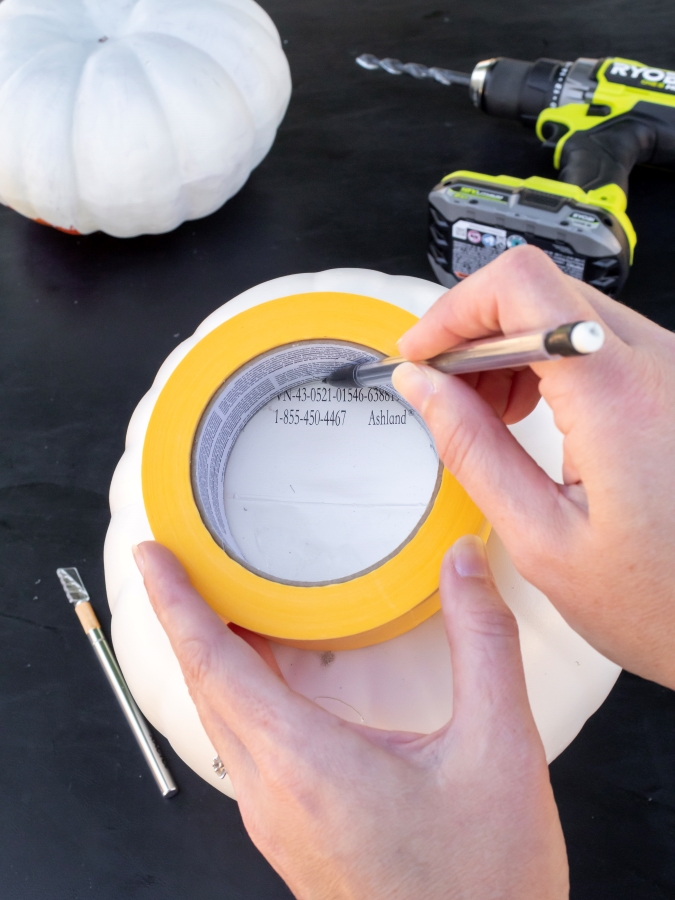
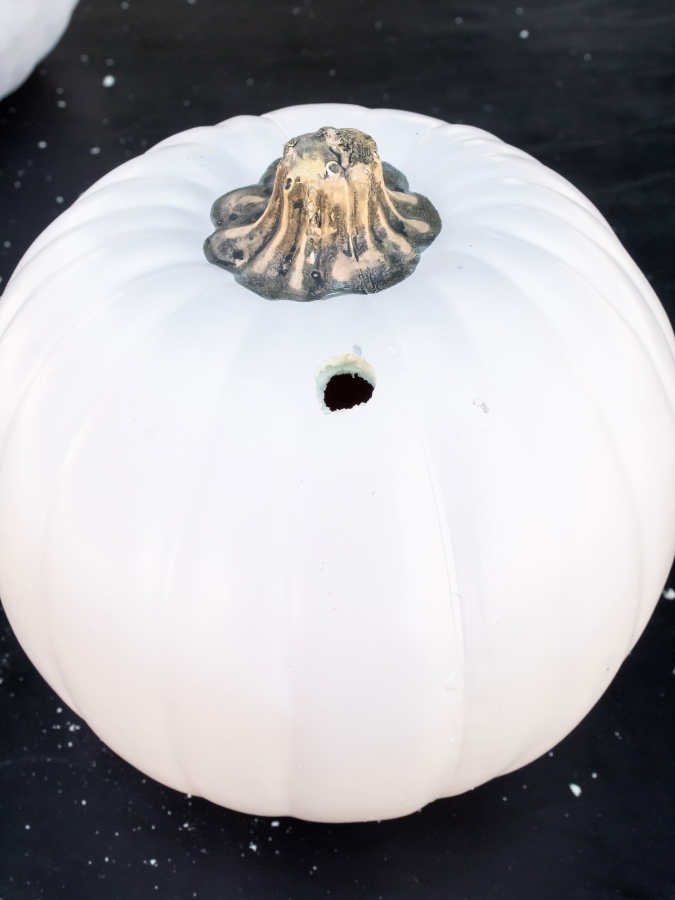
To turn your pumpkin into a luminary, you need some place to hide your lights. So, the first thing you need to do is trace a circle onto the bottom of your pumpkin. I used the inside of a roll of painter’s tape as a guide, but you could use a cup or a bowl. Anything will work!
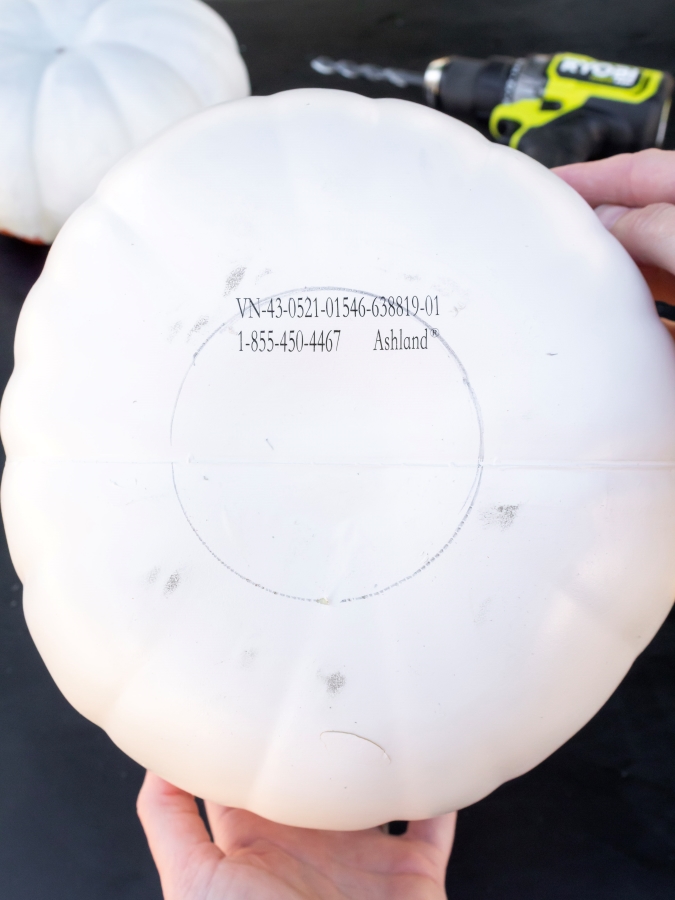
Just be sure the hole is large enough that you can place some battery-operated lights inside of the pumpkin.
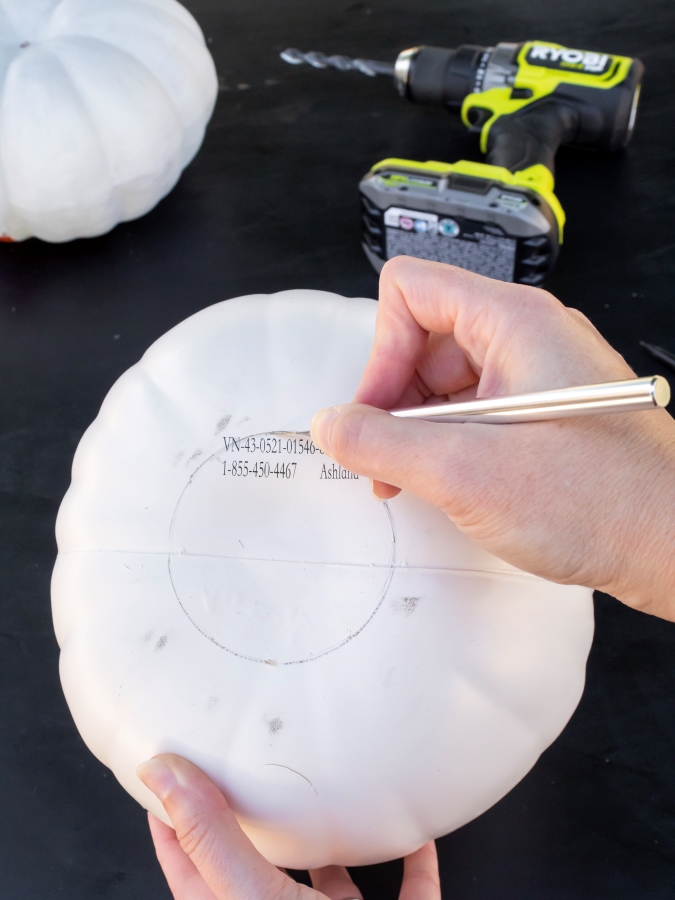
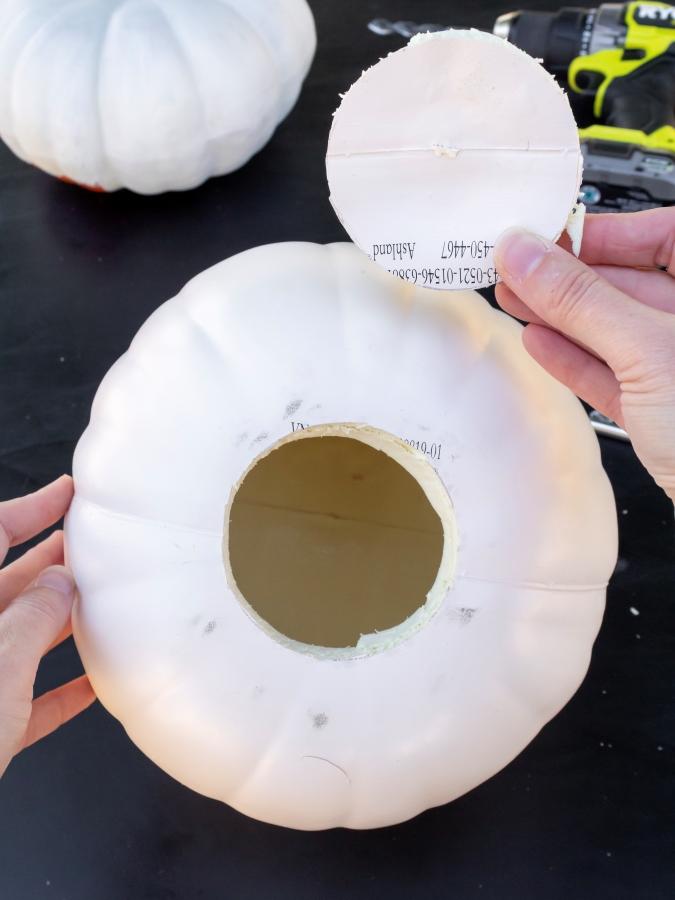
Then, use your X-Acto knife or a sharp utility knife to carefully score around the circle. Continue to cut until the circle has been removed.
2 . Drill Some Holes
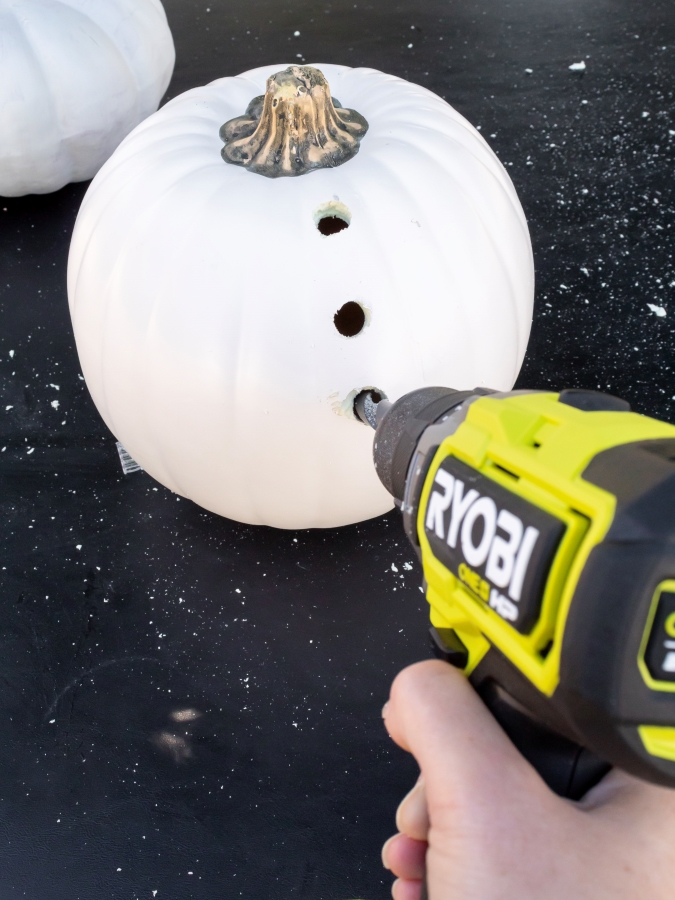
Next…the fun part! It’s time to drill some holes. You can use some tape to mark out your pattern in advance. Or, you can use my preferred method of measuring when it comes to crafting. The eyeball method. Ha!
It drives my husband, Kirk, nuts, but it works for me, so I decided to roll with it for this project.
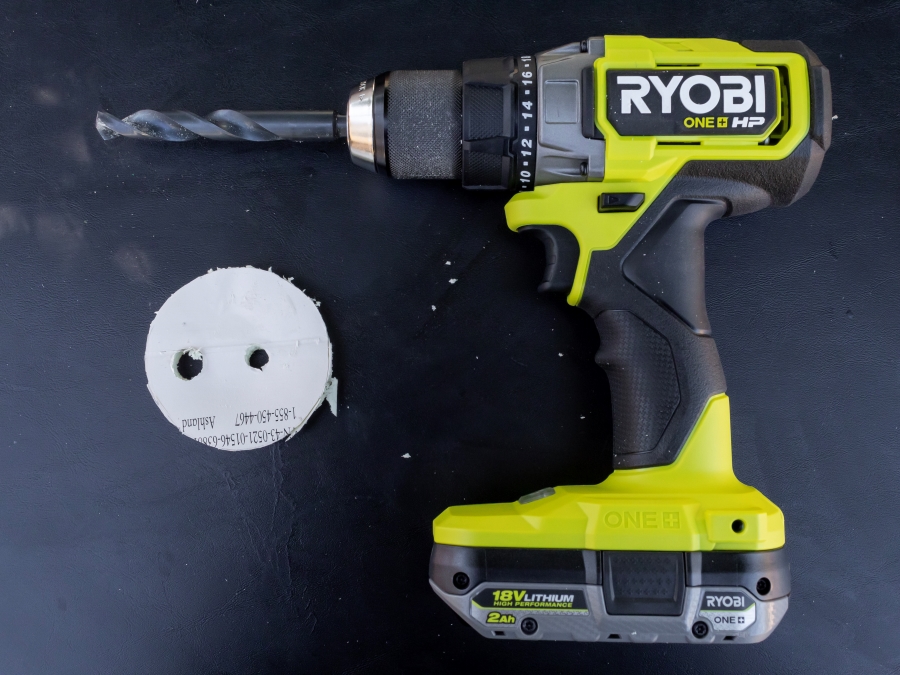
Before I made any holes in the pumpkin, I used the discarded bottom piece to do a few test runs. For my luminary, I used a 1/2 inch-sized drill bit.
You can mix and match hole sizes for your pumpkin luminary by using different drill bits. It’s all personal preference and whatever you like best.
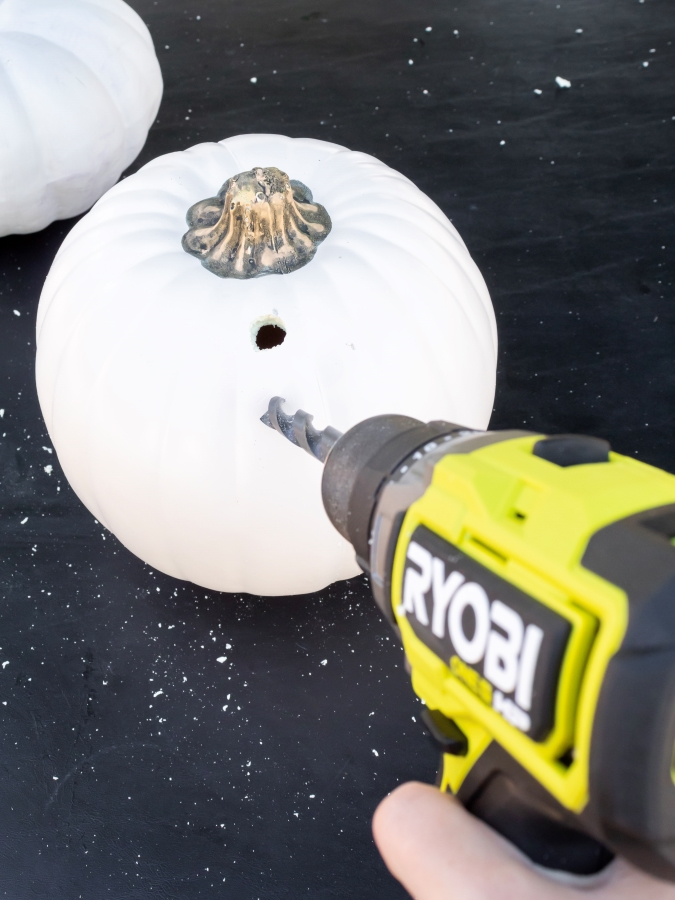
Once you settle on the size of the bit(s) you want to use, start to drill your holes. Take your time, and be sure to hold your pumpkin firmly in place so the drill bit goes in smoothly.
If you have a few rough edges around some of the holes, carefully use your X-Acto knife to shave down the foam and clean up the rough spots.
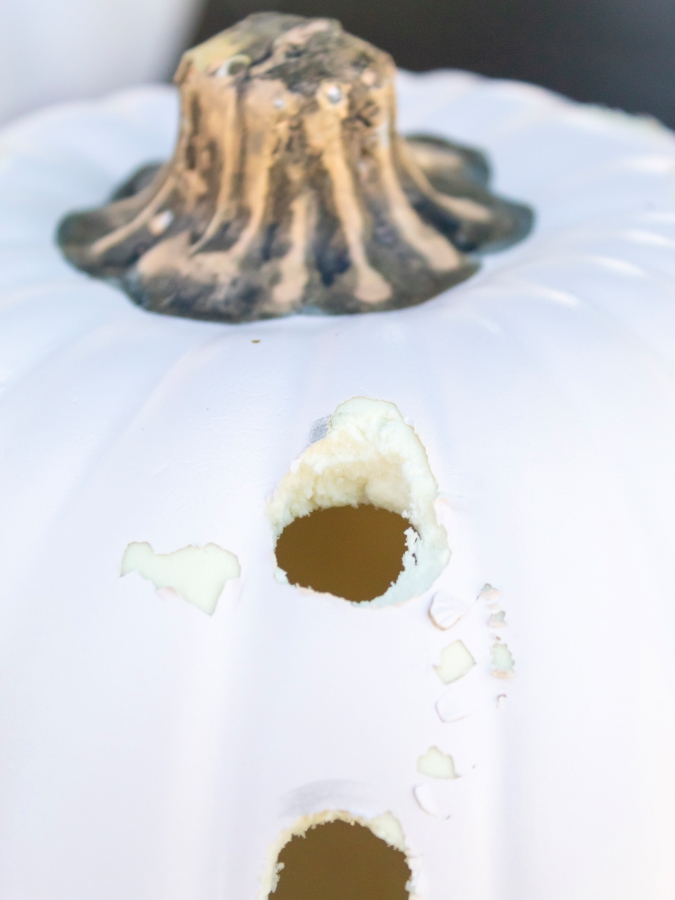
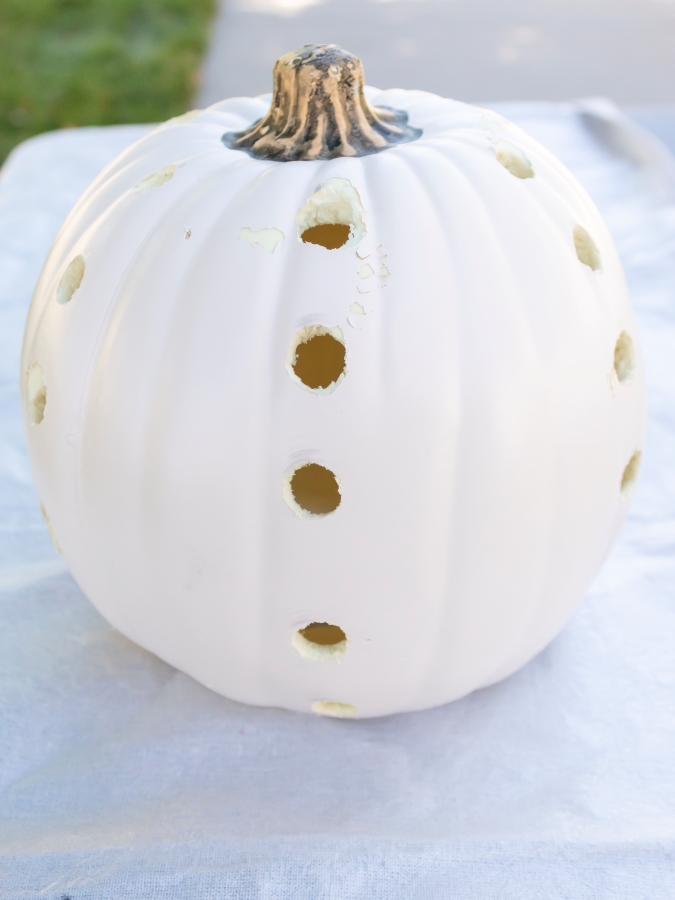
And don’t worry if the drill gets away from you and you make an oopsy like I did here. We’ll fix it with some paint!
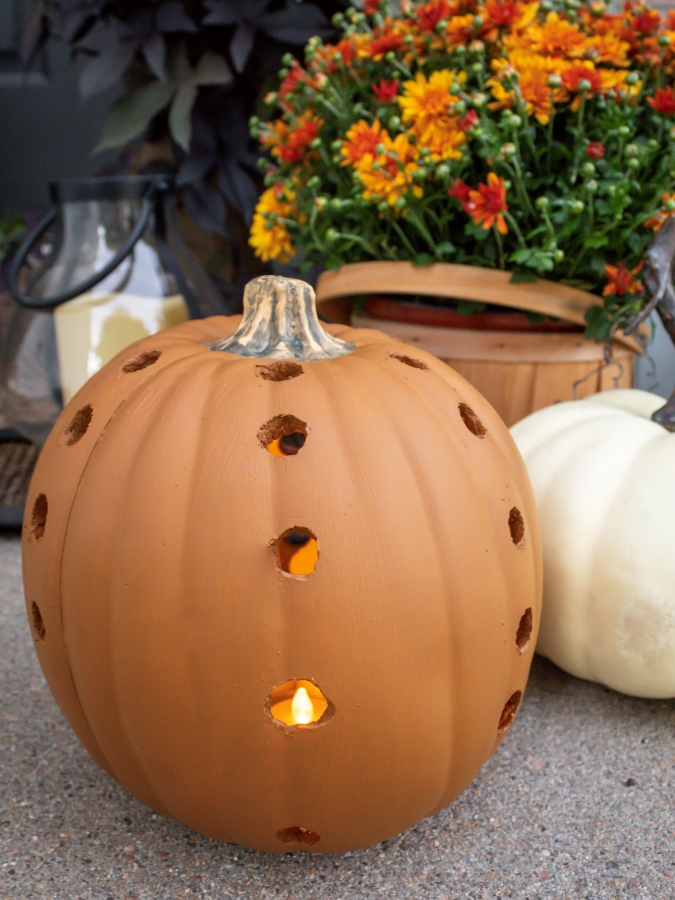
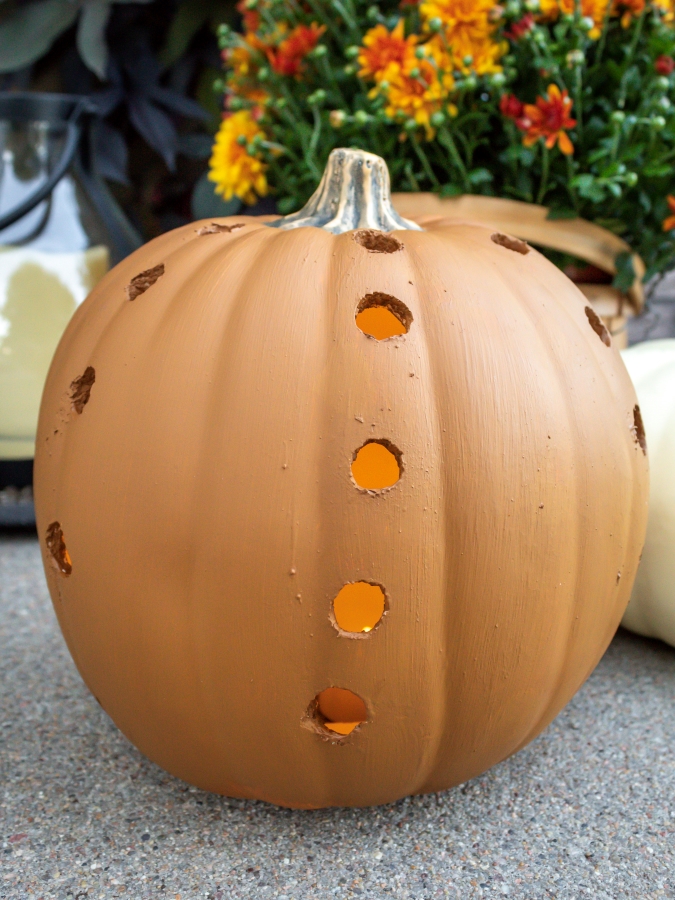
3 . Paint The Pumpkin
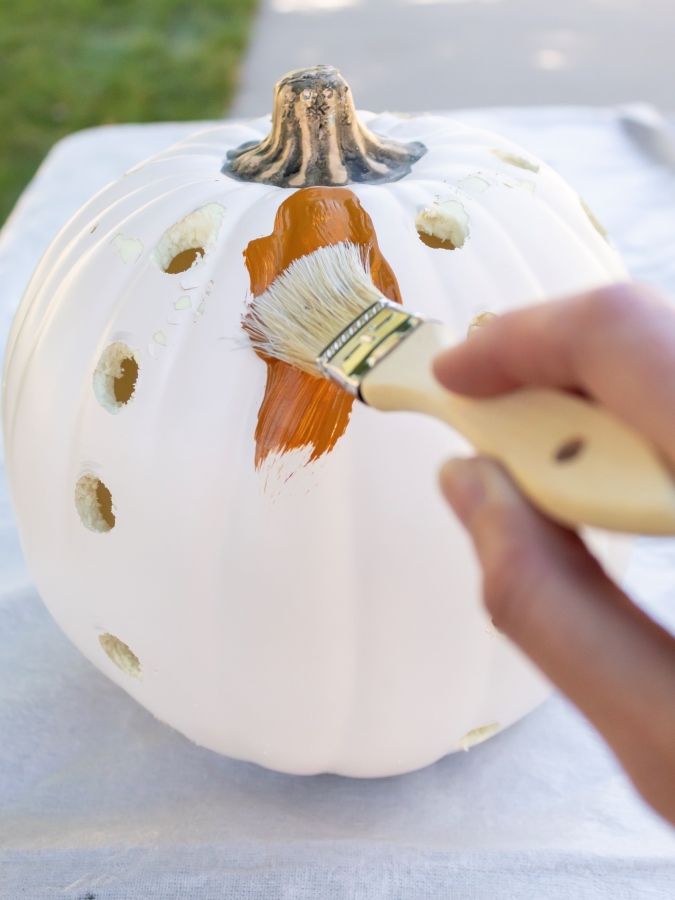
After you are done drilling your pumpkin, you can paint it. This step is optional, but I think it helps to make the project look more finished and softens the rough edges of the drilled holes.
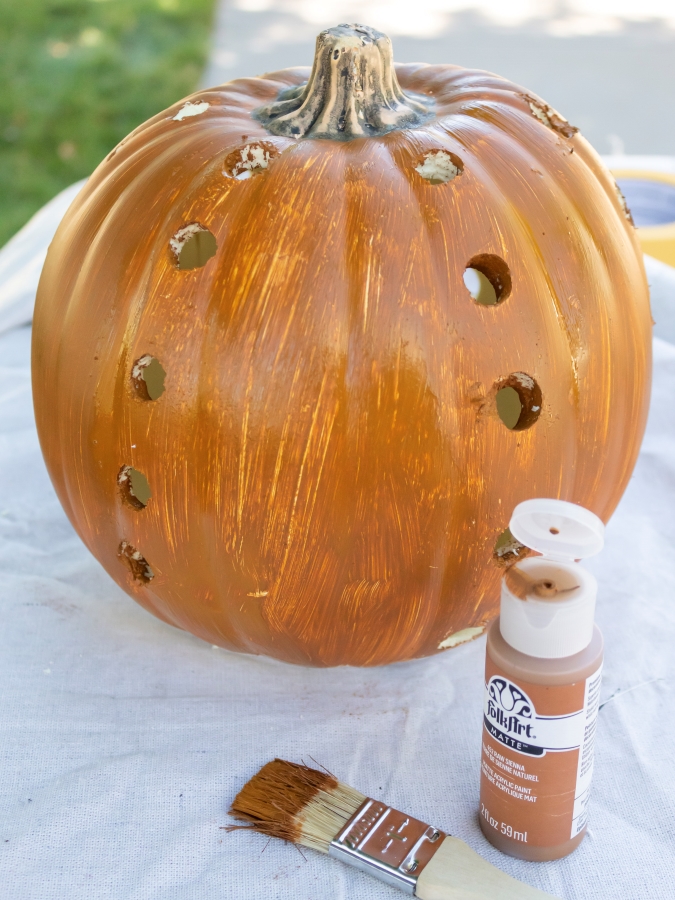
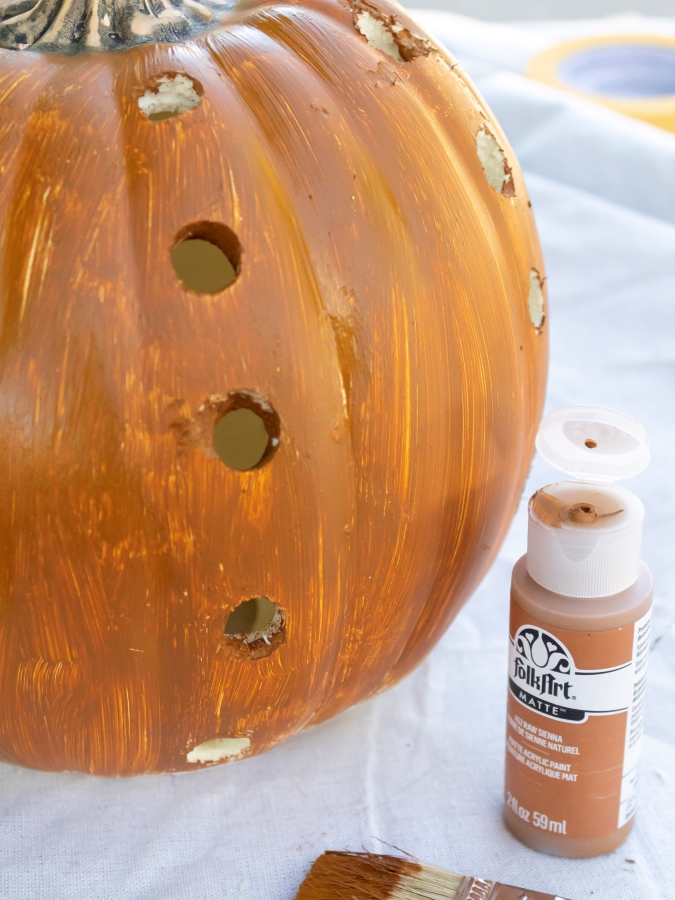
It took two coats of acrylic craft paint to cover one pumpkin.
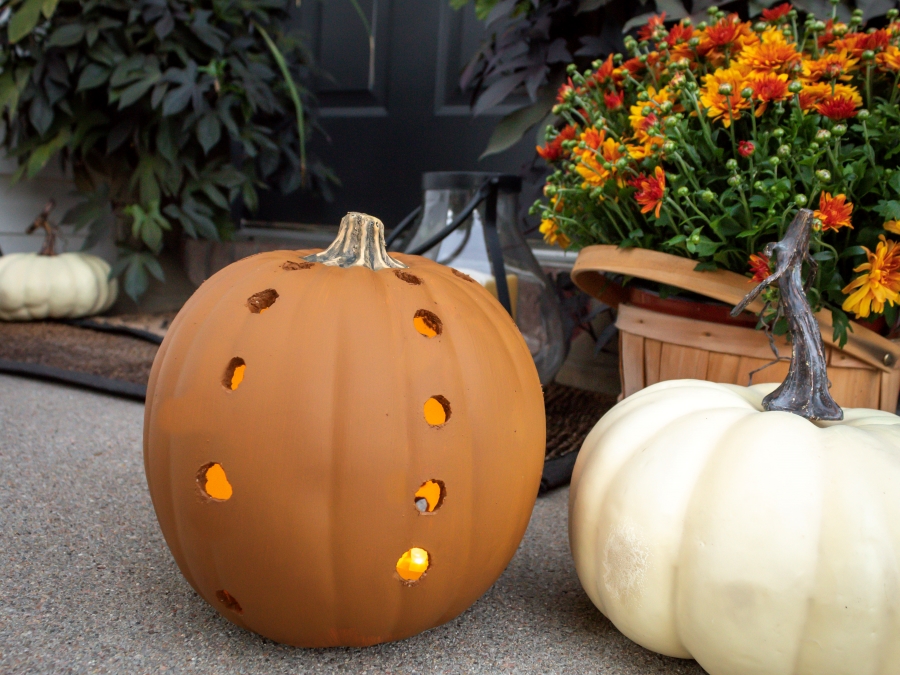
If you plan to display your pumpkin luminary outside, you might also want to spray it with a coat of clear matte sealer to protect the paint.
4 . Add Some Lights
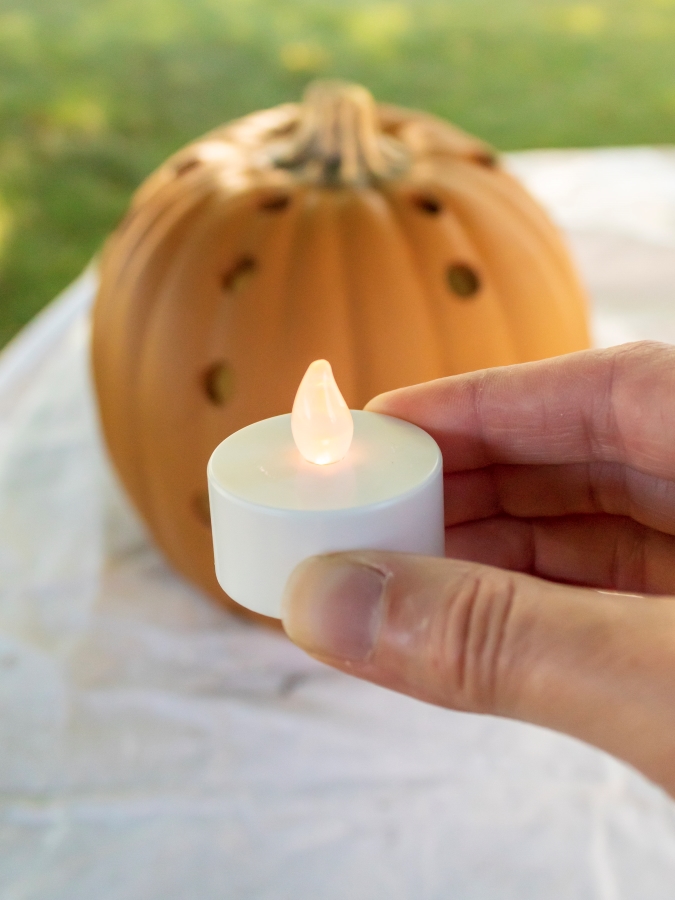
After the paint is dry, all that’s left to do is add some lights. I used a few small battery-operated LED tea lights from Dollar Tree.
If you have a larger battery-operated pillar candle, that will work too.
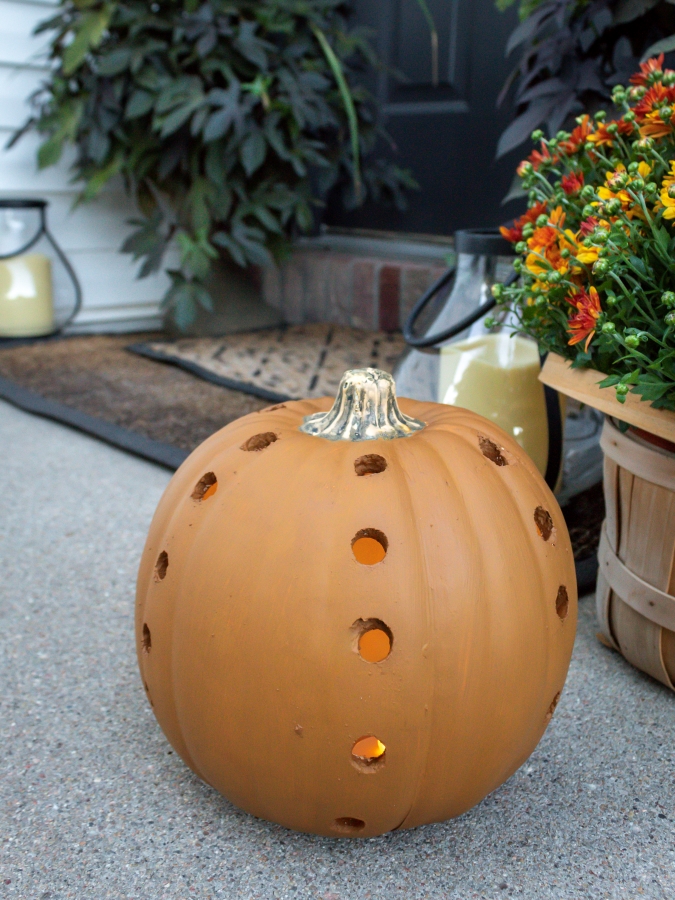
And that’s it! You have an easy (and budget-friendly) fall craft in just a matter of a few hours.
Here’s how much my pumpkin luminary cost to make:
Pumpkin Luminary Budget Breakdown
- Decorative Pumpkin from Goodwill: $10.71
- Paint: $1.17
- LED Tea Lights: $3.75
Diy Project Total: $15.63
And, because I don’t feel like the photos do this project justice, here is a fun idea pin I shared on Pinterest. It shows a bit more “behind the scenes” of the DIY process and what the finished pumpkin luminary looks like on our front porch at dusk.
To view the video, hover over the image and click on the black play button once it appears. Then, click the white arrow on the right to see the additional slides.
Or you can easily click the red “save” button on the top of the photo to view and save it to one of your Pinterest boards!

More Fall Decor Ideas
Thank you so much for visiting today! I love how this simple pumpkin luminary turned out, and I hope this post helps inspire you to make your own.
Next, visit be sure to stop by and visit Robyn at Robyn’s French Nest for her fall decorating tips. And don’t forget to check out all of the beautiful seasonal posts, linked below.
Xo,

Fall Décor on a Budget Inspiration


Eleanor Rose Home | The Country Peony | Green Valley Gable | Stilettos & Shiplap | Cottage In The Mitten


Le Cultivateur | Midwest Life and Style | Robyn’s French Nest | The Tattered Pew | Cottage on Bunkerhill
Did You Enjoy this Post? PIN It for Later!

We are featuring your DIY pumpkin Luminary on our Home Imagined link party#2 (Tuesday 9am-Thursday 5pm). Hope to see you there again!
Thank you so much, Megan. I appreciate it!
These would look amazing going down our driveway and around the door too, Jen! I love how you can reuse them year after year as well. It’s such a creative idea and I’m all kinds of excited to share it. Hope you have the best week, CoCo
Oh, yes! I bet that would look amazing CoCo. I can just picture it now. So pretty!
Love the idea. I found myself wandering through some stores today looking for large plastic pumpkins that I could DIY! lol. No luck but maybe next time.
I hope you find some! Such a fun and easy DIY. I can’t wait to make some more!
Jen, This is such a great idea and I love getting to share it as part of Welcome Home Saturday! Thanks for joining us this week!
Thank you, Kristin! It’s always a pleasure to join you. I hope you are enjoying your weekend!
Jen,
What an easy and clever idea. I’m sharing on Sunday’s Dirt Road Adventures. Great job.
Thank you so much, Rachel. I love how it turned out and can’t wait to make some more. I appreciate the share, too! Hugs!
Fabulous faux terra cotta look, Jen. I’d love for you to join us over at the Creative Crafts Link Party https://creativelybeth.com/creative-crafts-linky-party/ every Wed through Sun. Have a great week. Creatively, Beth
Thank you so much, Beth! I will be sure to check it out!
What a great idea Jen! I love that you can create all kinds of interesting designs and patterns with these. I bet they look so good at night!
Thank you so much, Maria. Yes, the twinkle at night is magical.
Such a brilliant idea! I love how you transformed these plastic pumpkins!
Thank you, Elizabeth. I am really happy with how it turned out.
This is such a fun DIY! The color you chose for the pumpkin was perfect! Saving for later!
Thanks so much, Stacey!
Now to sweet talk the hubs into letting me use his drill. Fingers crossed!
Yes! You can do it!
This is super cute!! I was looking for that paint color everywhere up here !!!
So super cute; I love this, Jen! I really want to try these!
Thank you, Robyn. They are so fun and easy to make once you get the hang of the drill…it got away from me a few times. Oops! This project was a good lesson in learning to embrace imperfections.
Jen this is my kind of project! I love how it turned out and that you used a power tool. Happy almost Fall…pinned!
Thank you so much, Kelly. Not going to lie. I was pretty proud of myself that I mastered the drill without help from the hubby. Starting with foam pumpkins was a good way to break myself in and get a bit of confidence.😉
What a great pumpkin idea Jen! Came out so cute! Thank you for stopping by to our first link party and help us celebrate. Have a great week.
Thank you, Meagan. Excited for your new party and to see all of the beautiful inspiration. I hope you have a great week too!
Amazing idea, Jen!!! I’ve seen similar pumpkins luminaries very similar to this one for upwards of $50!! Nice work, my friend!! How pretty to have on the front step or on a patio for the fall season!
Thanks so much, Rachel! Yes, it was so easy and way less than $50. Anyone can do this project!
Love this project, Jen. Such a great idea! Pinned
Thank you, Cindy!
Such a great idea. I love it. Happy Fall!
Thank you, Renae. Happy fall to you too, friend!
I absolutely love this project! It’s so pretty and the perfect fall accent piece. I definitely want to make one. Thanks so much for sharing your brillant idea! Always a pleasure to hop with you!
Thank you, Kim. These would look so pretty on your porch with all of your gorgeous mums. Happy (almost) fall!
Love this pumpkin luminary Jen! What a great idea!!! I bet they look so beautiful at night! Pinned!
Thank you, Heidi. Yes, the twinkle at night is magical.